How I Built My Observatory
Update - January 2022
Sadly, I had to say goodbye to this observatory as my wife and I have left Texas and relocated to New Hampshire.
I had always intended this to be a first-draft of what will be my "real" observatory.
I had always intended this to be a first-draft of what will be my "real" observatory. Unfortunately, I'm not quite sure when that will be. We moved into a condo here in Hudson, NH, and will be here for a year or two while we either buy or build our dream home. When we have that home, my first goal is to build my dream observatory with two piers (one for imaging, one for visual), a control/warm room, and more.
For now, I'm stuck setting up and taking down when I feel like using my eqiupment... but with a really tall tree-line where I am now... there's not a lot of point to it. Ah, well... in time....
As far as an after-action report on my first observatory: I learned several things with this project:
• First, it's never done. There's always something to improve on or add. But I enjoy that, so not a complaint.
• Second, flooring. I used non-treated subflooring OSB plywood. BAD CHOICE. Even though I treated it myself with some Thompson's water seal, this was a really bad choice and early spring of 2021 I ended up putting my foot through a section. In the long run, it was just a bad choice and I should have spent the money on the right materials. Dumb.
• I also ran into some problems with the roof early on. The only way to fix it ended up being to cover it with a tarp. I was never happy with that. In the next observatory, the roof will be a major improvement.
• And critter control was a proble as well. I ended up with wasp nests from time to time inside the shed (not counting mud daubers, which I really didn't mind too much). I also had a couple mice off and on, and eventually something that was leaving dust-like droppings in one corner of the desk. I feared it might be termites, but never found any sign of them and my exterminator just scrateched his head over what it might possibly be.
• Lastly, climate control. It got so hot inside the shed that it became difficult to keep a Telrad attached to a scope (the double-sided tape would soften and let go, even the heavy-duty kind). It was like an oven in there. It was impossible to work in the shed in the daytime most of the year. I installed a window-unit a/c, but it was too costly to run (I needed insulation to make that worthwhile). I want the next observatory to be a comfortable place to spend time year round.
I'm considering having my next one professionally built. I believe there's a group or two of builders that do them around the country. When people were building observatories at the club's dark site in the Houston area, a few of them had hired a group and the price, though not cheap, wasn't too terribly bad for what they got. I'm not sure yet, but I might go this route so it's done right.
I'm going to go ahead and leave this up for now, however, for reference for anyone interested. If you ever have any questions about it, please feel to reach out to me: JohnHaynes@jmhastronomy.com
In the spring of 2017, I finally built my own backyard observatory. The primary benefit of this is that it allows me to keep my equipment set-up and dialed-in. This is particularly helpful for astrophotography. But it is also generally far more convenient than having to set up equipment every time I want to use it.
Before I built the observatory, it would generally take about 60 to 90 minutes to haul out everything, unpack it, set up the tripod, attach the mount head, attach the counter weights, attach the main scope OTA, attach the guide/finder OTA(s), attach the Telrad, attach the Crayford focuser, unpack and attach an eypeiece to each, align the multiple scopes and finder, remove the eyepieces and attach cameras, balance the load, polar align, power up and do a star alignment, make sure all cameras and mount cables were properly attached, and begin my imaging process.
At the end of it all, there was another 60 or so minutes to pack it all up and put it all away.
Needless to say, I didn't get a lot of chances to do this. I can't tell you how many times I was leaving the office, driving home, and thinking to myself how great the skies looked... and how annoyed I was that I couldn't get everything out and do some observing or imaging - because I had to work in the morning.
Now, with the observatory, it takes me about 10 minutes to unlock the door, roll open the roof, power everything up, and get started. The longest part now is simply waiting for the GPS unit in the mount to synchronize with enoughs satellites.
Since I've had a few questions about it, I thought I'd do a post about constructing my observatory.
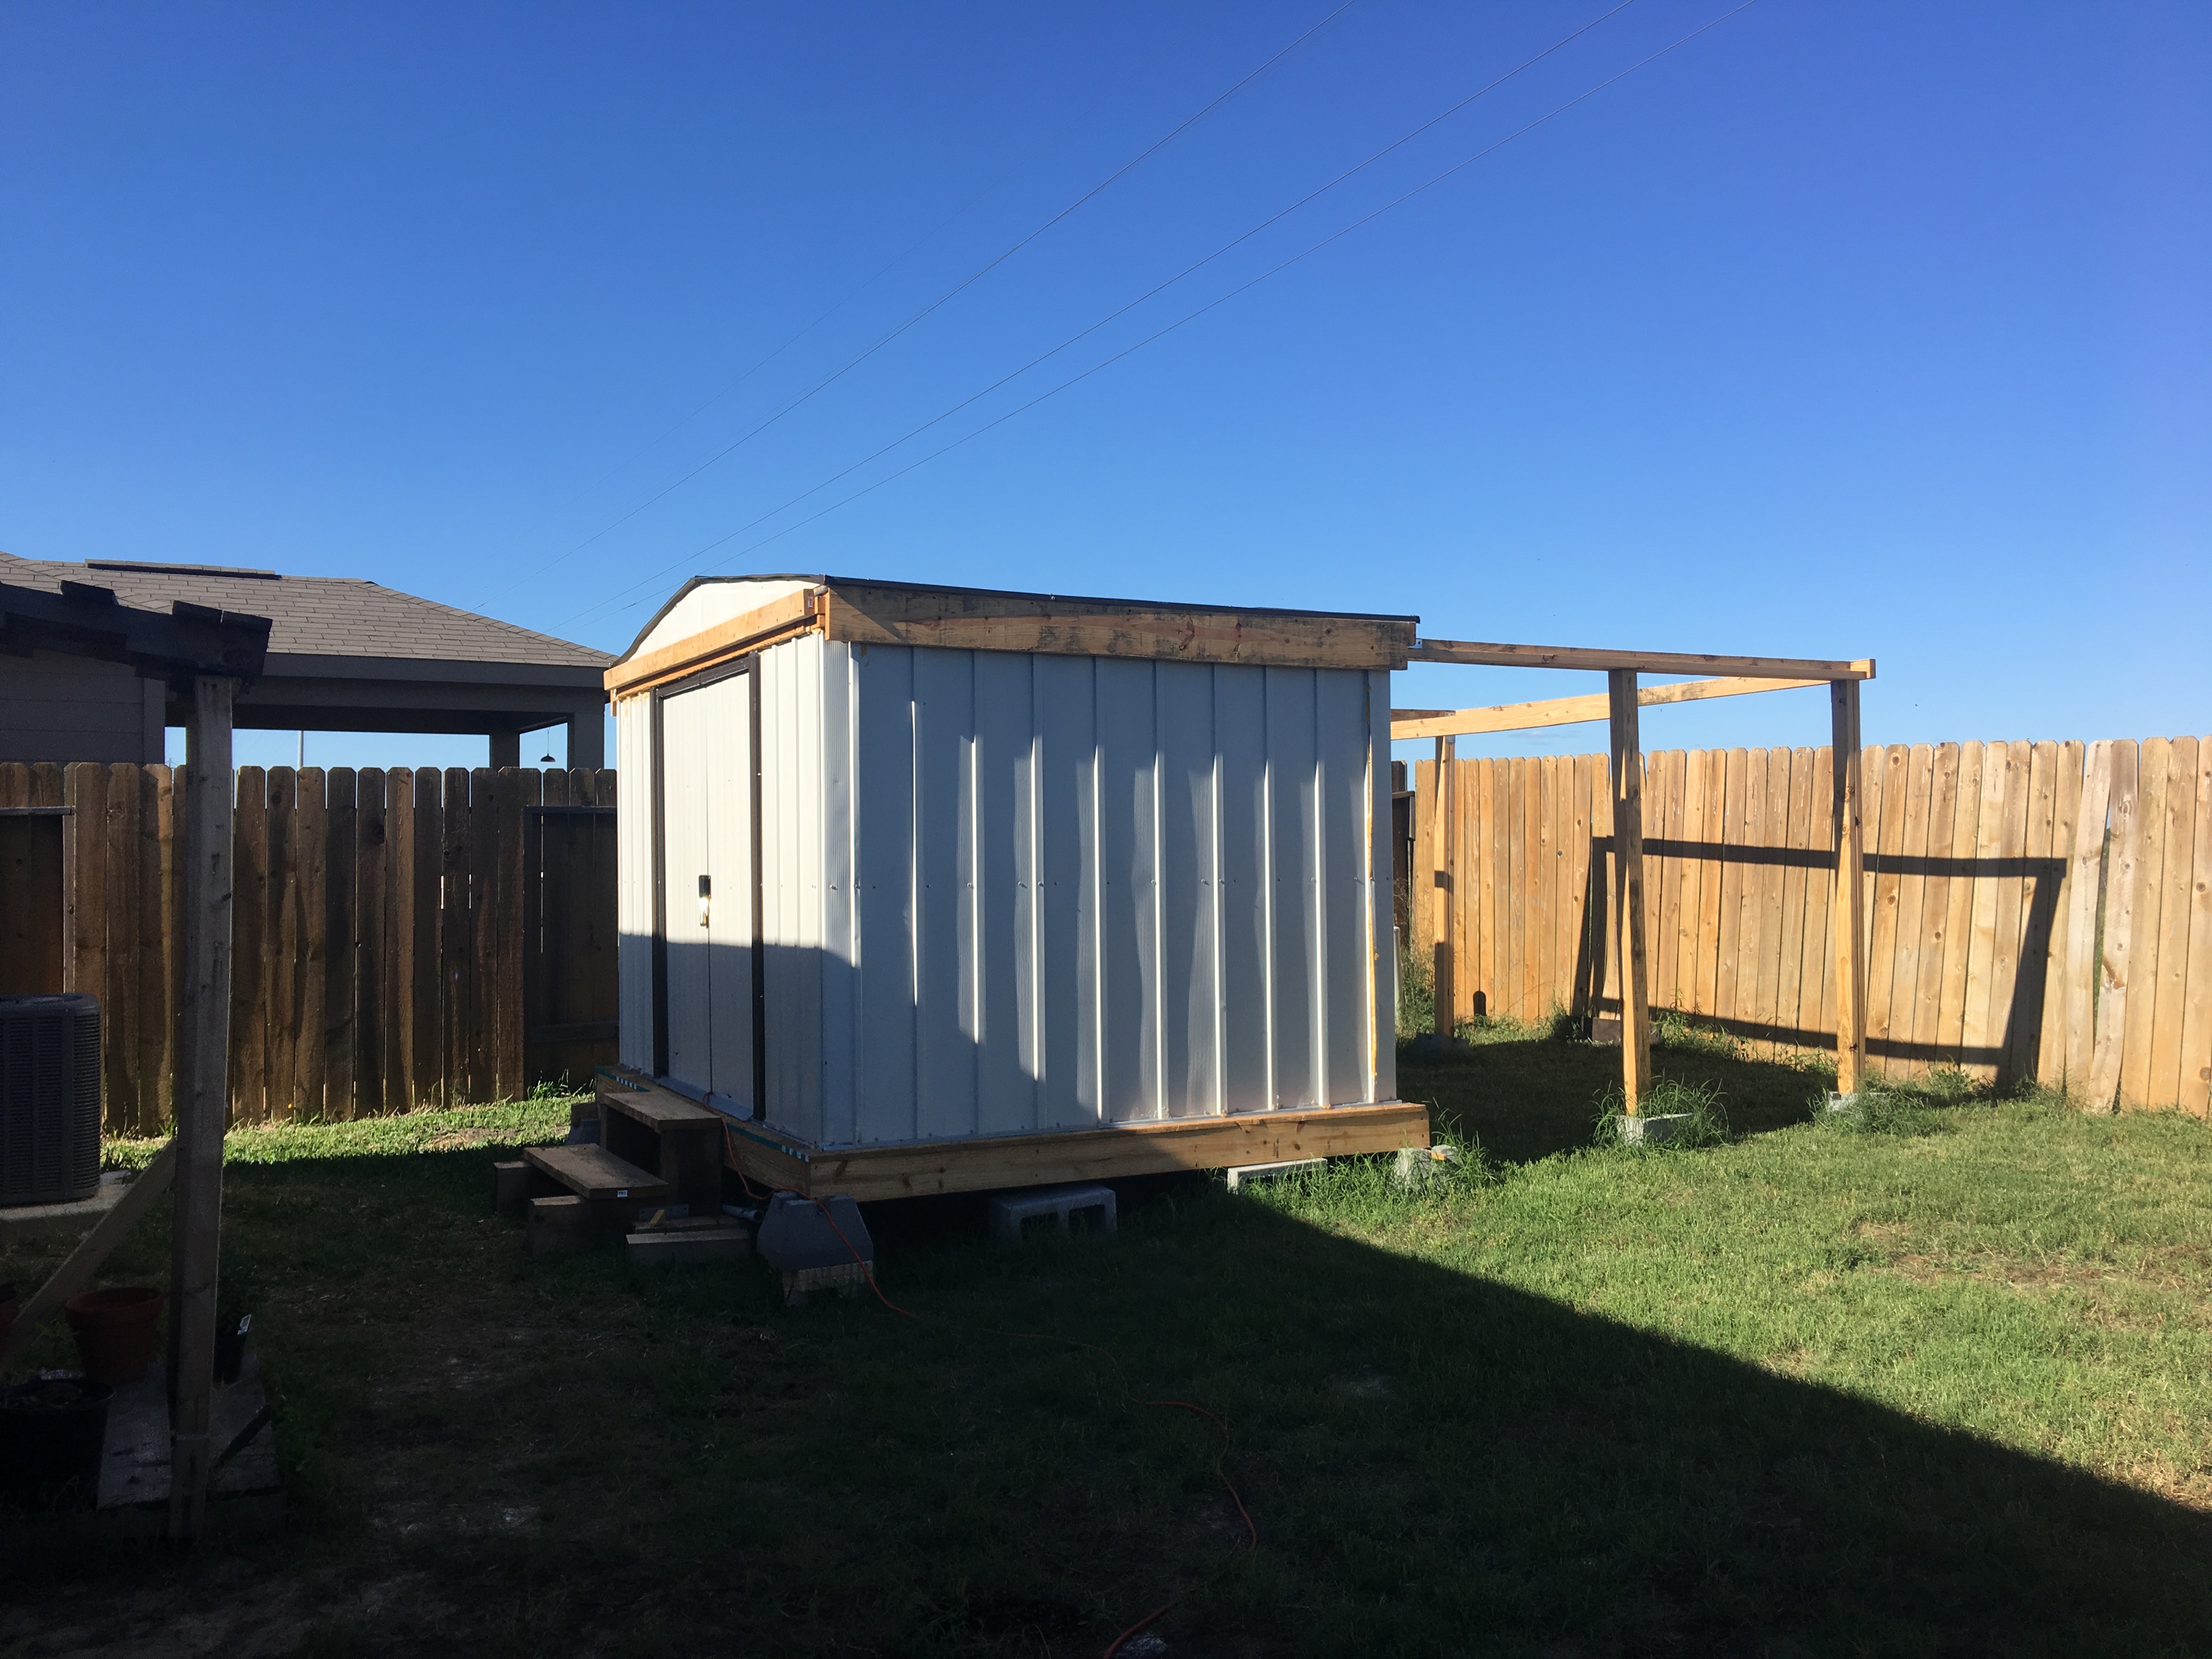
I'll give you the TLDR up front: I built a roll-off roof observatory based on an 8 x 10 metal shed. Yay!
And now for the RLPWR (Really Long, Probably Won't Read):
First off, I am not an expert in any kind of construction, so if you think you can do better, you likely can. If you think you can do cheaper and better, I'm not entirely certain of that.
Even before I bought my house I was designing my observatory using Google Sketchup, since it's free and pretty easy to use. I spent countless hours in the design phase and have several partly-finished models to show for it. Only a few were ever fully completed.
My intent was never to lay out a concrete foundation. I always intended a floating platform of some sort, probably on decking blocks. Since my back yard isn't exactly level or even, this made even more sense. I had helped with construction on a few others at my club's dark site. They had built decks like one might have in their yard and built the structure over that. I didn't like the idea of being that open to local creepy crawlies, so I decided to go with standard 3/4 inch subflooring plywood. I'd worked with that before and knew that it didn't take much to make something sturdy enough to tap-dance on (not that I tap dance, or dance in any other way.... just a turn of phrase). I intended a floor frame structure to be made of either 2 x 6 or 2 x 8 boards and held off the ground by decking blocks.
My original plan called for 2 x 4 stud walls to be covered with standard sheathing plywood, filled with fiberglass insulation, and the inside walls to be made of standard gypsum drywall. I had tinkered with various sizing layouts from 8 x 8 to 10 x 24. 10 x 24 would have been most of my backyard and I'm not sure my girlfriend, neighbors, or HOA would have been happy about that. 8 x 8 would have been a little too dinky - fitting the desk for the computer would have been tricky. I liked the idea of a separate warm (or, in Texas, more likely cold) room, and drew up several plans for that along with some that skipped it.
The hardest part for me was figuring out how to do the roof without being too heavy or complex. I knew I needed it to slope - a flat roof with as much rain as we get around here was just asking for trouble. I drew up several creative designs, but was never happy with any. One of the things I focused on was economy of design and material use. I paid close attention to measurements and common material sizes (2 x 4 x 8', 10', 12' framing studs, 4' x 8' sheets of plywood, etc...). A lot of my problems were with designing the roof with these mental constraints in place. It was driving me nuts.
I then happened across someone on CloudyNights who'd built their observatory using an 8' x 10' Arrow shed and claimed they built the whole thing for under $500. I was highly intrigued and started looking at this option.
Side note: Looking back, I'm not sure I would do it again, but it certainly HAS worked - and very well. If I could have overcome the roof issue, I think I'd be happier with an all-wood shed. Still, it is what it is, and I'm actually pretty happy with it as it is.
After researching specifics about the sheds and modeling out various options in Sketchup, as soon as I got my tax refund, I went out and purchased the Arrow Newport 8 x 10 shed. With tax it ended up being about $300-ish, give or take a buck or two. I then finished drawing up plans and submitted my plans to the dreaded HOA architectural review board. Luckily, they're easy to get along with, and I got the approval instantly (literally the "committee" of one person looked at it, asked me two or three questions about colors, and approved it while standing in her driveway).
The next step was to get time off from work. I put in for a week of vacation time, which was also rapidly approved.
Day 1
Saturday morning, I went off to the Home Despot and purchased 10 bags of QuickCrete, four 4' concrete reinforcement bars, a single length of 1.25" diameter conduit and a 90 degree elbow for it, an 8" diameter sonotube, four 6" long 5/8" bolts along with eight each nuts and washers, six deck blocks, three 4'x8' sheets of 3/4" subflooring plywood, four 10' 2 x 6 boards and two 8' 2 x 6 boards. Phase 1 was the base and pier.
Because I had other things that had to be accomplished on the weekend, I didn't get started until Monday morning. Monday morning, after sleeping in a little bit, I schlepped out into the yard, measured and staked my location, then started digging for the pier base. Once I was deep enough (over 3' deep and about 18" wide), I began mixing and pouring the QuickCrete. I wasn't entirely sure about this, having never really used it before. But, other than being f'ing HEAVY, it worked out reasonably easy. I mixed and poured what ended up being about 5 bags into the hole. I then inserted the four sections of rebar in about one foot each and waited to let the base set a bit. I cut the conduit to length and used a hole saw to put a hole in the tube for the elbow. The idea here was to create a cable passage down through the tube. I secured the lower end, measured to be about 18" above the ground, with duct tape. Once the base was set (still wet, but very stiff), I slipped the sonotube with the conduit down over the rebar and then began mixing and pouring more concrete. Another 3 1/2 to 4 bags later, the tube was full. I had previously cut a piece of plywood and drilled holes in a diamond pattern to hold the bolts. I put the bolts in, using the nuts to hold them so that the heads of the bolts dangled down into the concrete, leaving plenty above for mounting equipment. I placed this over the tube and pushed the heads of the bolts down in. Later I found out I should have used j-bolts, but these standard galvanized hex bolts worked out just fine. This completed the first day.
Day 2
On day two, I began to assemble the base. I cut 3" off each of the 10' 2 x 6 boards. I then laid out the deck blocks and placed the 8' boards at the north and south end and two of the 10' boards on the east and west sides. Using 3 1/2" drywall screws, I screwed the frame together, making sure to keep it nice and square, then screwed the remaining two 10' boards in place about 30" in from each side.
The placement of the pier was designed so that it was just over 4' in from the north end. I placed the first 4'x'8 sheet of plywood on the north end and screwed it down with 2" drywall screws. It ended about an inch or so from the pier, which was centered east-west. For the next sheet of plywood, I used a circular saw to cut out a 12" x 12" square in the middle of the north-edge. This fit around the pier with a couple inches of space all around. I screwed this sheet in place, then placed the third sheet, which extended over the edge of the frame by 2'. I left it in place temporarily, as it made a convenient place to set things while working.
Next, I began assembly of the shed. Lots of parts. I first laid out the base frame. Then there was a lot of pre-assembly of components. Then I ran into the first and only real difficulty of the construction. This really is not a one-person job, but my girlfriend was at work/school during the day. When assembling the sides of this type of shed, you REALLY need at least one other person, preferably several, and/or absolutely no wind. All week I dealt with a light breeze that, at times, was a little more than light. When putting up the corners of this shed, even a light breeze is a massive pain in the ass. As such, it probably took me about ten times longer than it would have if I'd had at least one more person to help. Once the corners are in place and the upper frame is attached, it's pretty stable. It was getting to that point which almost did me in. Luckily, my girlfriend came home just as I was contemplating finding a tall cliff to swan-dive off of. We got the corners placed and used some rope as guy wires to hold it in place for the night. Day two, the nightmare day, ended.
Day 3
On day three, I half-expected to wake up to the frame having collapsed and me having wasted about $300. However, our jury-rigging had held up overnight and the structure was still standing. The rest of the day was centered around assembling the rest of the walls and lower-part of the shed and doors along with another trip to the Home Despot for more lumber.
Day 4
On day four, I built the lower-half of the roof interface. The way the shed is designed to be assembled, the roof is, of course, directly attached to the walls. To allow for the separation between the roof and shed, I needed two matching frames, the bottom one on top of the walls and the top one under the roof.
I built the lower one in-situ right on top of the shed walls. I added four 2 x 3 studs in the corners to better hold things together and provide additional structural support. Later, after I'd completed construction, I added six more: two each on the east and west (10') walls, and one each on the north and south walls. I intend for these also to provide attachment points for internal walls when I do some additional improvements over the winter.
One concern I had with the sliding of the roof was preventing it from falling into the shed if it wasn't quite rolling straight. To help prevent this, I attached an additional 2 x 4 perpendicular to the frame, on the inside of the Northern and Southern ends of the frame to serve as a guide for the roof. When the roof went on, the wheels would be outside of this, so it couldn't roll off into the shed. So endeth day four.
Day 5
Day five started with the upper half of the roof frame. This was the mobile part, which would require a bit more rigidity. To aid in this, I added two 8 inch long 1/4" lag screws to each corner, instead of my customary drywall screws. The drywall screws are great for most things, but for something like this they were a bit weak and I was afraid of them snapping when the roof was rolled back and forth. The lag screws are much sturdier and provide better rigidity. To make it even more solid, I added a joining plate with eight 1" drywall screws (four into each board) on the top and bottom of each corner.
I began to assemble the roof, but ended up cutting this short. I needed to get to a steel supply store in town today, so I secured my job site, climbed into the car, and drove into town. I originally planned to get two 1/4" plates, but ended up with 1/4" after seeing someone else's arrangement with a much heavier scope and mount than I had. The plates are 10" x 10" and 1/4" thick. They were pre-drilled with holes for 5/8" bolts in the corners, but these were too far out to use for mounting to the pier. That's ok, because I had other plans for them.
When I got them home, I tried drilling the holes for the pier bolts myself, but my drill press (more likely my drill bits) just wouldn't do it. I ended up having a friend drill the holes using the same piece of plywood I used to hold the bolts in place while the concrete set. This would allow the lower plate to be bolted directly to the top of the pier.
I purchased four more 5/8" bolts, each 5 inches long, along with sixteen nuts and twelve washers. I ran the bolts up from underneath the first plate and secured them with a washer and nut. I then ran two nuts down onto each bolt, and topped them with a washer. The second plate was placed over that, then the last washer and nut. This allows for the top plate to be adjusted for levelling. I used two nuts underneath so that one would lock the other in place. This is VERY solid.
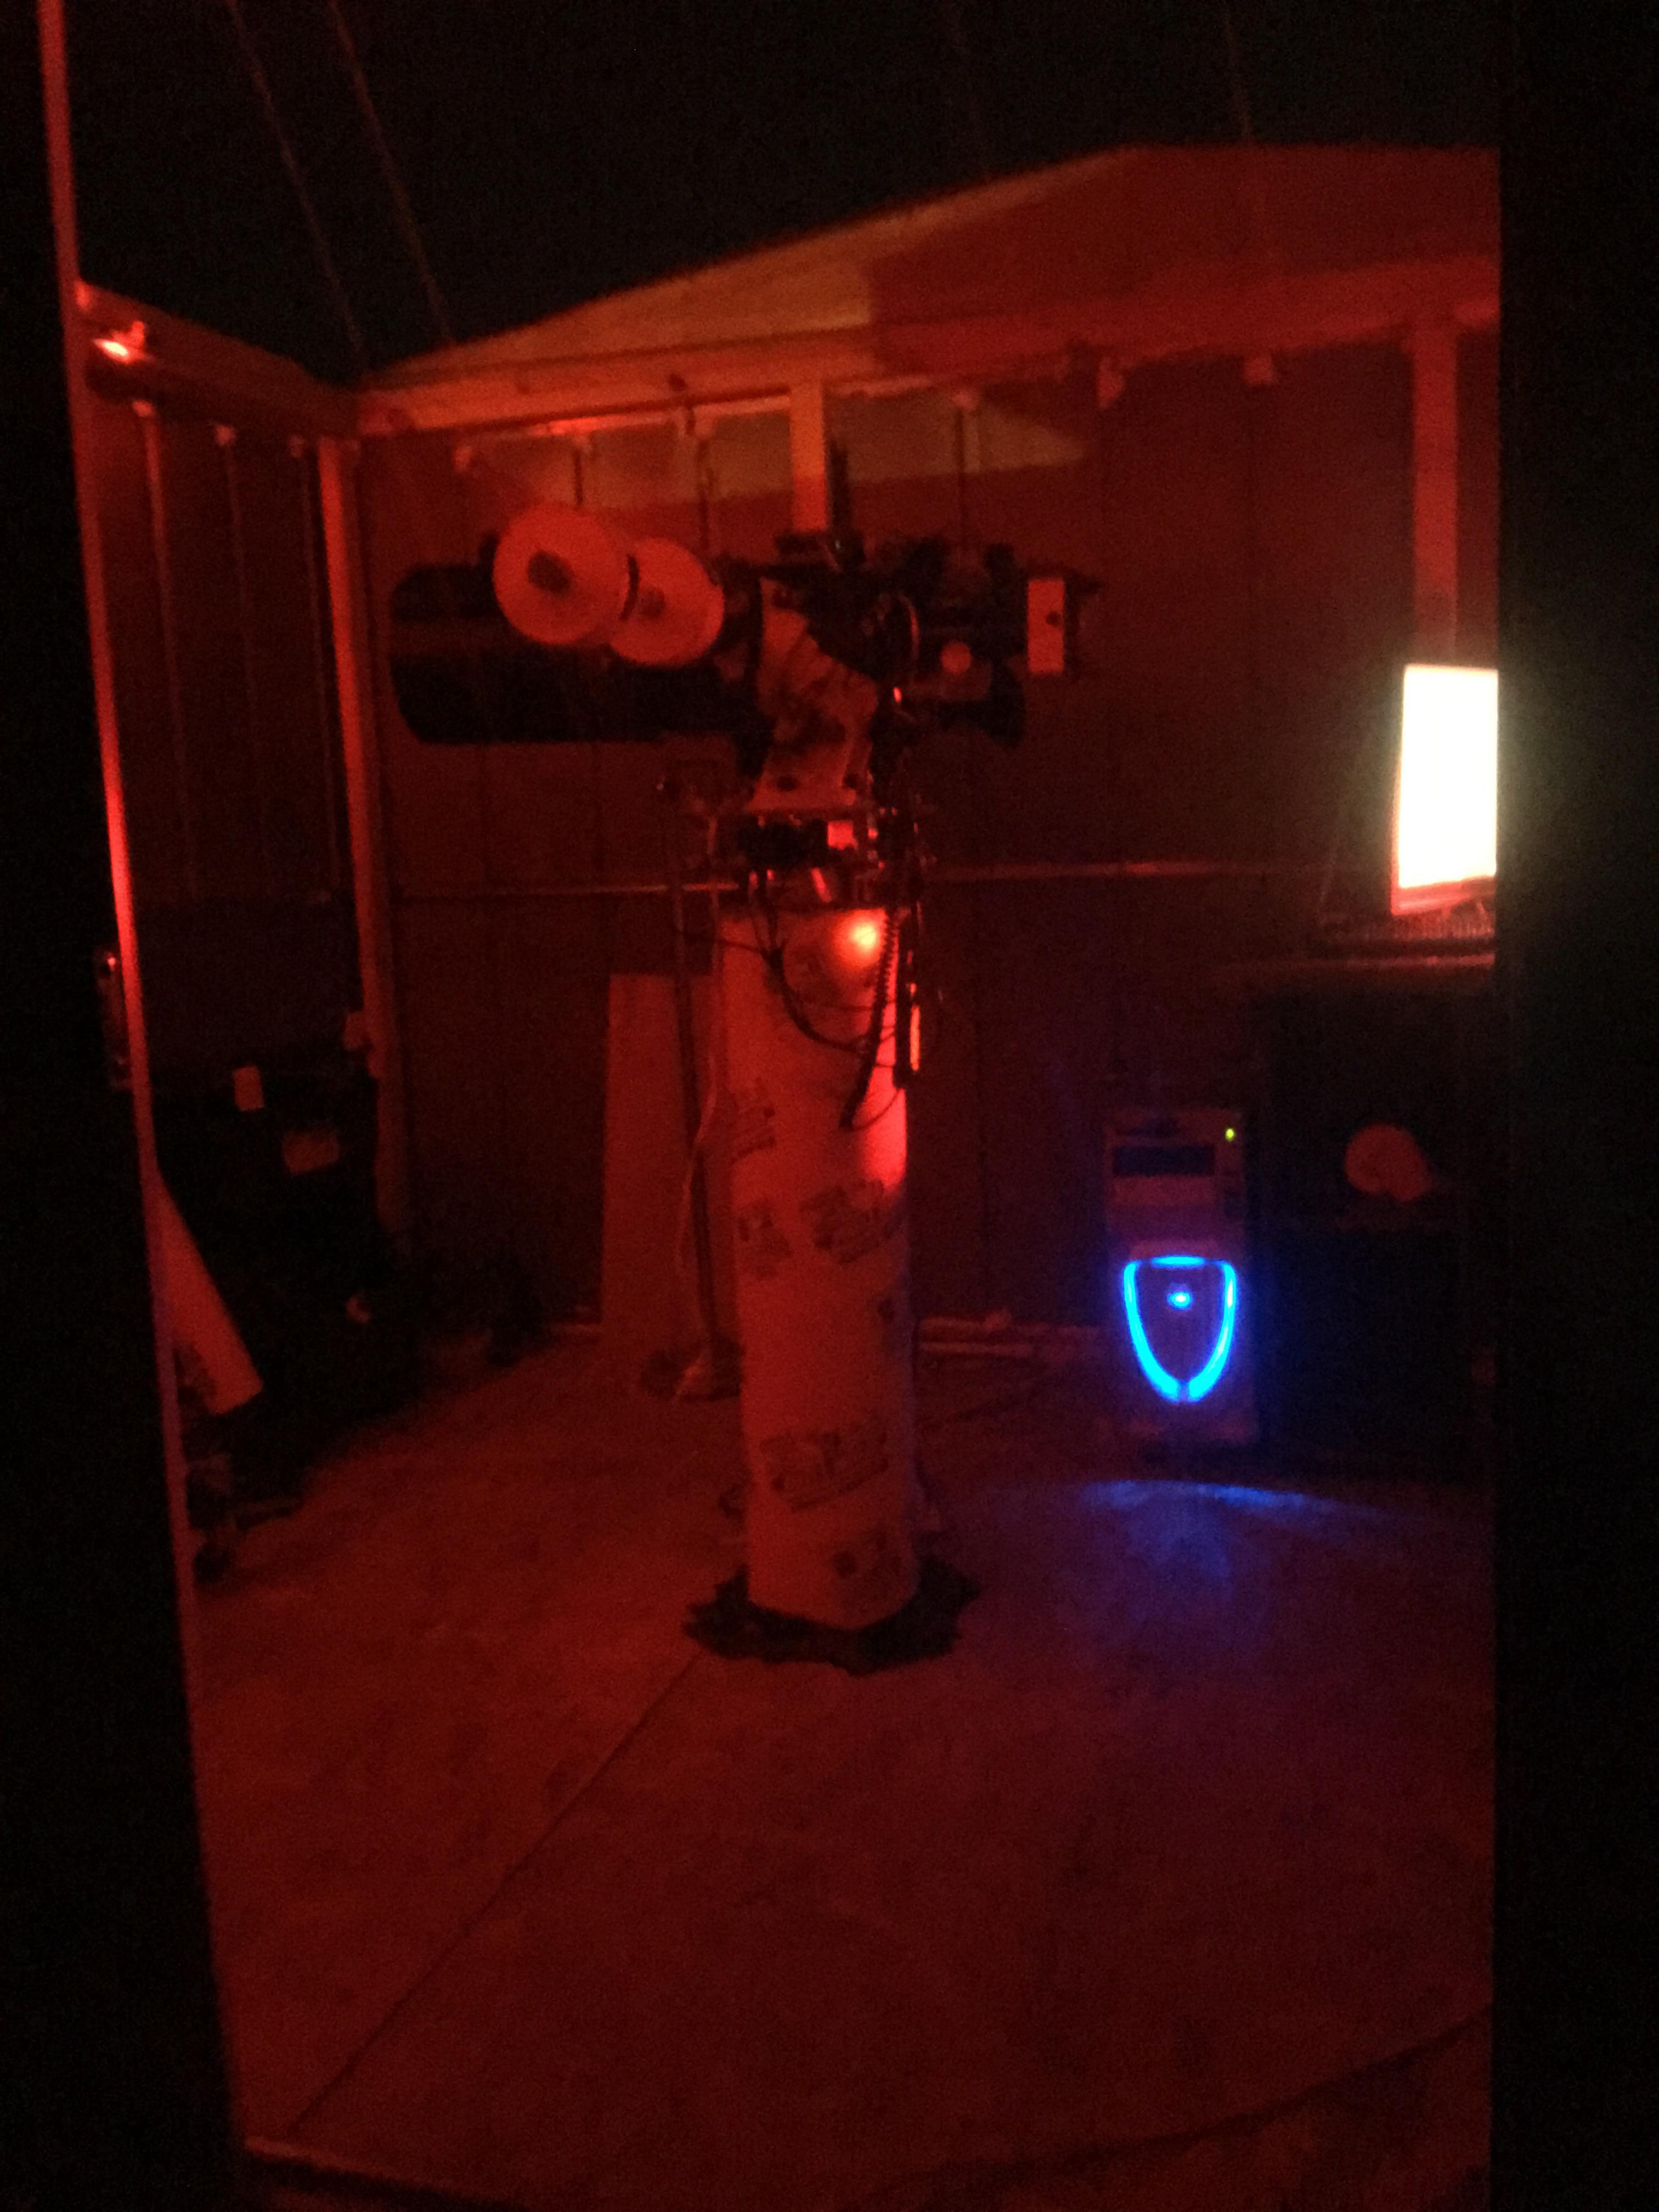
I then drilled the top plate and tapped the holes to handle the mount itself. My iOptron mount has 4 holes laid out in a diamond pattern along with a center post. I drilled the center, then the four additional holes. The front hole takes a post for the azimuth adjustment, and the other three take the mounting screws. My holes weren't quite perfect, and one of them is a little tight, but they work ok in the long run. The mount, when attached, is pretty rock-solid. The iEQ-45 itself weighs 25 lbs. I have three counterweights, each weighting 11 lbs. With all the equipment I can put on it, my rig weights a little over 30lbs. So, combined, the mount, scope, counterweights, finders, etc... all total about 90lbs. I have to kick the pier hard to notice any motion.
Day 6
Day six was Saturday. At this time, I knew my time was running short and I needed to at least have the roof attached before going back to work. So I spent the morning constructing the roof on top of the wooden frame. Normally these little sheet metal screws would attach it to the walls of the shed. Instead, I used a handful of drywall screws to secure it and several of the sheet metal screws to make sure it screwed down completely. I did not elect to put the wheels on yet, figuring it would be easier to get on top of the shed this way. This later made it significantly harder to mount the wheels, but, in the end, I got it done.
With the help of my girlfriend, by the end of the afternoon we go the roof lifted up and slid into place on top of the shed, thus meeting my minimum goal of having the observatory closed up before my time ran out.
Day 7
Day seven, my last vacation day, I built the open-roof support frame. I'd originally planned to use 4 x 4 posts and a 2 x 4 frame. But for some reason, 4 x 4's are significantly more expensive, more than double the cost of using two 2 x 4's screwed together... so that's what I did. The furthest two posts were set on deck blocks, and two more, halfway out, sit on the ground inside a standard cinder block to keep them from moving. Amazingly, my cuts were very accurate, and the whole thing was pretty level when assembled.
The inside-edge of the frame has a perpendicular board, just like the roof frame, to prevent the roof from sliding off in the wrong direction. Two more boards are attached at the ends for stability and one more, perpendicular, at the end to serve as a roof stop so it doesn't run off and take out the back fence.
I also had to do some work to finish leveling the building (before adding the support frame), as my yard is not particularly level. My intent is to use a car-jack later to jack up each corner, one by one, place in a section of a 12" sonotube, and pour concrete pillars that are the exact right height. For now, however, the deck blocks and shims I have in place are plenty sturdy (they even stood up to Hurricane Harvey, which was a significant tropical storm when it ran over my house).
A few more days of work
I was back to work on Monday. But after work I was able to attach the roof wheels and two side boards that hang over the edge on the North and South side. This is to further prevent the roof from rolling the wrong way as well as to help with keeping out rain. Another board was attached to the front that forms a front stop as well as helps with weather proofing. Lastly another board is attached to the back for the same reason. Some weather stripping has been attached to help keep it water resistant.
The following weekend I purchased two tubes of silicone caulk and two cans of spray foam. These have been used to seal the cracks along the edges, though I still have some leaks on the floor. I've actually gone through four tubes of caulk and one can of that as-seen-on-tv rubber sealant (the one where the guy spray paints the screen door with it and uses it in the bottom of a boat. I STILL have water that leaks in on the floor and I'm not sure where it's coming from. I'm still working on that, but I've drilled drain holes in the worst areas to help for now.
Ongoing And Future Work
At this time, I'm still using an extension cord to run power out to it. I've purchased some direct bury cable, a 20 amp fuse, one 20 amp GFI outlet, and two more 15 amp outlets. This fall/winter I intend to dig the trench out to the fuse box, run the cable and have a 20 amp circuit available. The GFI outlet will be the first in the string, which is where the window-unit AC will eventually plug into. The two 15 amp circuits will handle the computer, scope, cameras, and red lamp. I'm also considering getting one more outlet and outside casing for it and mount it outside to plug in stuff for the yard. I may start on the internal wiring this weekend. That may sound like a lot of outlets for one circuit, but the A/C will only be used with the roof closed and everything else turned off, and it's, by far, the main power draw.
I had originally planned to use Wi-Fi for internet. This has been problematic for two reasons. First, the distance to the router made it pretty unreliable. Even when I added another router closer, it's still not a great signal. But even then, the data transfer rate on Wi-Fi isn't nearly as fast as wired. My typical modus operandi is to roll open the roof, power up, set up on a target and start an imaging run, then go in the house and watch a movie, managing it from my laptop or from my desktop computer in my home office. The image files from my main imaging camera are around 50 MB each. Transferring them by Wi-Fi is slowwwwww. I bought 100' of shielded Cat5e and ran it out. This is MUCH more reliable and MUCH faster. I bought some conduit and buried it, bringing it in under one corner of the floor. I have no network issues anymore... other than the fact that the computer I have out there is a piece of crap.
Along with the power wiring, I intend to get some rolls of fiberglass insulation. This is the other reason (besides structure) that I put in the 2 x 3 studs. Once I get the insulation in, I will face it with plywood (probably thin, cheap MDF) and paint it all black. Of course, before I do that I need to eliminate the leaks. Overhead, I'll put in more MDF and fill the roof-space with a good layer of fiberglass insulation. This should pretty well insulate the shed. I'll cut a hole in one wall and mount a window-unit air conditioner. A 5,000 BTU unit can handle up to about 150 square feet of space. My shed is slightly less than 80 square feet, probably closer to 75 with the walls complete. This should be no sweat at all for a 5,000 BTU unit.
The A/C will also help cut down humidity. After discussions with other guys in my club (the Houston Astronomical Society), they said that humidity wasn't that large a problem, though it's definitely better to keep it down. When I get the A/C unit installed, I'm guessing I'll be just fine.
I also plan to put in some cheap, vinyl flooring over the bare wood, but that's probably a last-step.
In Conclusion
All-told, I'm expecting my final cost to still be under $1,500 grand total. As it is, I think my total has been about $800, give or take. If I were in a little better shape and a little better with construction and had one reliable assistant (not to say my gf is unreliable… but she wasn't always around when I needed her as she has her own life, job etc… she was a massive help nonetheless) I could have done everything in a week, no sweat.
If I were to do it all over, I might skip the shed altogether and just construct wood-framed walls. I think the cost would be similar. The only real issue there is the roof. The steel shed roof has been great, and very hard to beat for ease of construction and cost effectiveness. Most likely, I'll sell this house and move in a few years, and at that time I'll probably revisit my designs.
So... there you have it. That's how I built my observatory.
I'd be happy to answer any questions about it. You can email me at JohnHaynes@jmhastronomy.com
Some Pictures (In order)
 |  |  |
 |  |  |
 |  |  |
 |  |  |
 |  |  |
 |  |  |
 |  |  |
 |  |  |
 |  |  |
 |  |  |
 |  |  |
 |  |  |
 |  | |
|  |
My Equipment
- Mount:
- iOptron iEQ-45
- This is a first-flight iEQ-45 with the 8406 hand control. Even though it's the older version, it's still a great mount. It's rated for 45 lbs (20 Kg) and can handle everything I put on it.
- Telescopes:
- Orion 8 inch f/3.9 Newtonian Astrograph
- This is now my main imaging scope. I got it on Amazon from a third-party seller. It was used, but just barely. Came with a Telrad, laser collimator, and a couple other accessories. I have it mounted now with the Vernonscope (see below) as an autoguider. I also have a Baader Coma Corrector. The STF-8300C (see below) is the primary imaging camera at this time with the Atik 16C as the guide cam.
- Meade 2080
- This is my old trusty-dusty (ok, I try to keep it not so dusty) 8" Schmidt-Cassegrain telescope. It's an f/10 (as are most SCT's). I found it on Craigslist for $100 - a real steal. Now that I have the Orion 8 inch, this is now going to be mounted on my backup mount, an old Celestron CG-5 ASGT. It will become my main visual scope, most likely.
- Vernonscope 80 mm
- This is actually a Lumicon SuperFinder, 80mm, f/3.75. Though it's only a doublet, it has great optics. It serves as both a wide-field imaging scope, guide scope, and a finder scope, depending on what I'm doing. I love this little scope!
- Orion ST-80
- This is a pretty typical 80mm f/5. Not bad for wide-field imaging, makes a great addition to the arsenal.
- Meade DS2000 Series 90mm
- I originally bought this for guiding. Very long focal length (f/11.1). Not a great scope, but it gets some use here and there.
- Unbranded 8" Newtonian
- Another $100 find. Bought this from a friend who bought it from Craigslist. Not a great instrument, but has potential. It's an f/4, so very fast, but has an ungodly thick spider.
- Optical Craftsmen 6" Newtonian
- This is a gem. Made in the 50's or 60's, they don't make them like this anymore. This has amazingly crisp optics. A beautiful mirror that produces beautiful views. At f/8 it makes a great planetary scope.
- Imaging Cameras:
- SBIG STF-8300C
- This is my main imaging cam. Very sensitive, clean images, low noise.
- Canon 350D (Astro Modified)
- This was my main cam before I got the SBIG. I really like the cam, but it requires a 32 bit version of windows (newer drivers aren't available).
- ATIK 16C
- I bought this to be a guide cam. Unfortunately, it's only USB 1.1, so it's slow. Still not a bad little camera. Does well with the 80mm scopes.
- Meade DSI Pro (First Edition)
- I bought this and the next cam for $75 total. Make great guide cams. Also not bad for imaging. I'm working on making these my planetary cams.
- Meade DSI (First Edition)
- Makes a good guide cam.
- Meade PC Cam
- This was cheap. It's a simple webcam. Not bad for planetary work.
- Unbranded Cam
- Given to me by a friend. Same as the Orion StarShoot Solar System cam, but unbranded. Not bad, but not great.
- Eyepieces:
- Meade 5000 Series, 2" 40mm, 60°
- Meade 5000 Series, 2" 32mm, 60°
- Meade 5000 Series, 1.25" 26mm, 60°
- Meade 5000 Series, 1.25" 12mm, 60°
- Meade 5000 Series, 1.25" 5.5mm, 60°
- This is a full set. I don't typically like eypiece sets, but these are really pretty good eyepieces. The 40mm is like a porthole in a spacecraft to the stars.
- Celestron Ultima 35mm (1.25" 50°)
- Celestron Ultima 30mm (1.25" 50°) (I have two of these beauties!)
- Celestron Ultima 18mm (1.25" 50°)
- These are the old late-80's vintage Celestron Ultimas. They were favorably compared to the Televue eyepieces of the day. These are really a great value, though they're getting to be as scarce as hen's teeth. The two 30mm's are my favorites, great eyepieces in smaller scopes.
- Celestron Omni 40mm (1.25" 43°)
- This was a bit of a dissapointment, but not too terribly bad. It's a wide-angle, but the 1.25" diameter makes it a bit restricted.
- Meade 4000 Series 26mm (1.25" 52°)
- For a cheap eyepiece that comes with a scope, it's not bad. I use it with my finders regularly.
- Meade 4000 Series 12.4mm (1.25" 52°)
- Again, not a bad eyepiece, though nothing fancy.
- And many more...
- I have several others, but, honestly, I just don't use them. I mostly do Imaging, and when I do use an eyepiece, I stick with the Meade 5000's or the Celestron Ultimas.